
InVista Method
The InVista Method consists of the following steps:
DESIGN - PLANNING – INSTALLATION – EVENING ADJUSTMENTS
CONSULTATION / Design
Set Objectives: Together we discuss what can be reasonably achieved with a lighting system within the constraints of the budget. We write down all of the desired objectives.
Walk the property: Walk the property, and note key vantage points (including the approaching road AND indoor rooms with great sightlines to your front and back yards.) First, we think about the visual composition of the entire scene. We note what is beautiful and distinctive about the property. We recognize features of the landscape and structures, as well as, repeating patterns and interesting forms. Next, we determine focal points and decide where you want the viewer's attention to be directed. Then we pay attention to transition areas and apply the basic elements of design to create a scene that satisfies your objectives.
Photograph fixture locations: As we decide on the location of each fixture, we will take digital photographs of each spot. These photos are later used during our proposal presentation and installation phase and will be superimposed with an image of the exact fixture type, lamp wattage, and beam spread to be used at specified locations.
Rough Sketch: Next, a rough sketch of the property is made, labeling each of the important areas and features. In addition, digital photographs of the project site will be taken to support the sketch and better record the location of the fixtures. Then we'll measure and estimate the distance of each wire run, and check for the availability of 120V power source for transformer.
planning
Sizing Calculations: Working from the rough sketch, we use the "Preliminary System Requirements Worksheet" to record all the information needed to make the necessary system sizing calculations; from correct transformer size, gauge of direct burial wire, to the type of fixtures/bulbs/beam spread required to achieve the desired lighting effects.
Project worksheets & diagrams: All of the project documents are produced at this stage, to plan the system and facilitate the subsequent installation.
Installation
Fixture Preparation: After unloading all materials, the stakes and
stems are attached to the fixtures. Then we'll stage each fixture at its proper location according to our drawings and digital photographs taken during our Design walk-through.
Trenching: Low voltage lighting wire requires a minimum of a 6 inch burial and can be run without conduits. This is where our crew will use a slit trenching technique to dig narrow trenches along each wire run and between fixtures and splice junctions.
Running Wire: Starting at the transformer, a wire run will be pulled from the spool to the splice junction. Each wire run is then labeled at both ends with numbered wire markers. Then we'll run the lead wire from each fixture to the nearest splice wire junction.
Lamping Fixtures: The fixtures are now installed into the ground. In doing so, each fixture is lamped with the correct LED lamp according to type, wattage, and beam spread.
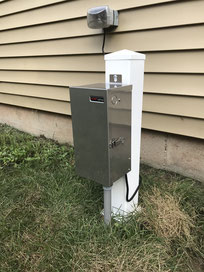
Testing / Verification: before leaving the site, we test and verify that all fixtures and system components are in working order. While most transformers are simply screwed into a 4x4 pressure treated post, InVista Lighting takes the time to dress-up the post with a PVC sleeve, cap, and base trim. We've seen first-hand it's often the little things that make the biggest impression.
EVENING ADJUSTMENTS
It is our best practice to return later in the evening, to walk the homeowner through the various lighting scenes, system features, and finalize fixture adjustments to ensure that they are properly aimed.